雪花算法(SnowFlake)
雪花算法原理是生成一个的64位比特位的long类型的唯一id
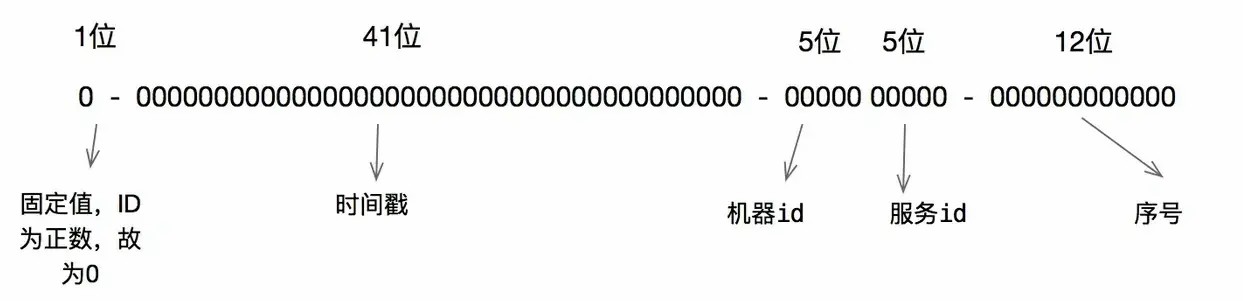
最高1位固定值0,使生成的id为正整数
41位存储毫秒级时间戳,2^41/(100060 6024 365)=69,大概可以使用69年
10位存储机器码,包括5位datacenterId和5位workerId,最多可以部署2^10=1024台机器
12位存储序列号,时间戳同一毫秒时,通过这个递增的序列号来区分,即对于同一台机器,一毫秒时间戳可以生成2^12=4096个不重复id
可以将雪花算法作为一个单独的服务进行部署,然后需要全局唯一 id 的系统,请求雪花算法服务获取 id 即可
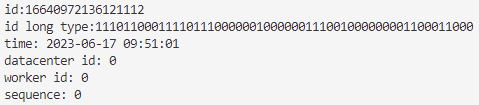
1 2 3 4 5 6 7 8 9 10 11 12 13 14 15 16 17 18 19 20 21 22 23 24 25 26 27 28 29 30 31 32 33 34 35 36 37 38 39 40 41 42 43 44 45 46 47 48 49 50 51 52 53 54 55 56 57 58 59 60 61 62 63 64 65 66 67 68 69 70 71 72 73 74 75 76 77 78 79 80 81 82 83 84 85 86 87 88 89 90 91 92 93 94 95 96 97 98 99 100 101 102 103 104 105 106 107 108 109 110 111 112 113 114 115 116 117 118 119 120 121 122 123 124 125 126 127 128 129 130 131 132 133 134 135 136 137 138 139 140 141 142 143 144 145 146 147 148 149 150 151 152 153 154 155 156 157 public class SnowflakeIdWorker {private final long twepoch = 1598598185157L ;private final long workerIdBits = 5L ;private final long datacenterIdBits = 5L ;private final long maxWorkerId = -1L ^ (-1L << workerIdBits);private final long maxDatacenterId = -1L ^ (-1L << datacenterIdBits);private final long sequenceBits = 12L ;private final long workerIdShift = sequenceBits;private final long datacenterIdShift = sequenceBits + workerIdBits;private final long timestampLeftShift = sequenceBits + workerIdBits + datacenterIdBits;private final long sequenceMask = -1L ^ (-1L << sequenceBits);private long workerId;private long datacenterId;private long sequence = 0L ;private long lastTimestamp = -1L ;public SnowflakeIdWorker (long workerId, long datacenterId) {if (workerId > maxWorkerId || workerId < 0 ) {throw new IllegalArgumentException ("worker Id can't be greater than %d or less than 0" , maxWorkerId));if (datacenterId > maxDatacenterId || datacenterId < 0 ) {throw new IllegalArgumentException ("datacenter Id can't be greater than %d or less than 0" , maxDatacenterId));this .workerId = workerId;this .datacenterId = datacenterId;public synchronized long nextId () {long timestamp = timeGen();if (timestamp < lastTimestamp) {throw new RuntimeException ("Clock moved backwards. Refusing to generate id for %d milliseconds" ,if (lastTimestamp == timestamp) {1 ) & sequenceMask;if (sequence == 0 ) {else {0L ;long id = ((timestamp - twepoch) << timestampLeftShift) return id;protected long tilNextMillis (long lastTimestamp) {long timestamp = timeGen();while (timestamp <= lastTimestamp) {return timestamp;protected long timeGen () {return System.currentTimeMillis();public static void main (String[] args) {SnowflakeIdWorker idWorker = new SnowflakeIdWorker (0 , 0 );for (int i = 0 ; i < 1000 ; i++) {long id = idWorker.nextId();
SnowFlake 雪花算法详解与实现 - 掘金
snowflake算法(雪花算法)_LQJ灬的博客-CSDN博客
分布式唯一 ID 生成方案浅谈
分布式自增ID算法——雪花算法 - 简书
雪花算法改(增加数据信息) 根据实际项目的需要,修改SnowFlake的结构
0 - 0000000000 0000000000 0000000000 00000 - 0 - 0 - 0 - 0000000000 0000000000 00000
1
2
3
4
5
6
7
8
9
10
11
12
13
14
15
16
17
18
19
20
21
22
23
24
25
26
27
28
29
30
31
32
33
34
35
36
37
38
39
40
41
42
43
44
45
46
47
48
49
50
51
52
53
54
55
56
57
58
59
60
61
62
63
64
65
66
67
68
69
70
71
72
73
74
75
76
77
78
79
80
81
82
83
84
85
86
87
88
89
90
91
92
93
94
95
96
97
98
99
100
101
102
103
104
105
106
107
108
109
110
111
112
113
114
115
116
117
118
119
120
121
122
123
124
125
126
127
128
129
130
131
132
133
134
135
136
137
138
139
140
141
142
143
144
145
146
147
148
149
150
151
152
153
154
155
156
157
158
159
160
161
162
163
164
165
166
167
168
169
170
171
172
173
174
175
176
177
178
179
180
181
182
183
184
185
186
187
188
189
190
191
192
193
194
195
196
197
198
199
200
201
202
203
204
205
206
207
208
209
210
211
212
213
214
215
216
217
218
219
220
221
222
223
import java.util.Date;import java.text.SimpleDateFormat;public class MySnowflakeIdWorker {private final long startTimestamp = 1686904669147L ;private final long workerIdBits = 2L ;private final long datacenterIdBits = 1L ;private final long maxWorkerId = -1L ^ (-1L << workerIdBits);private final long maxDatacenterId = -1L ^ (-1L << datacenterIdBits);private final long sequenceBits = 4L ;private final long infoBits = 20L ;private final long timestampBits = 64 - 1 - workerIdBits - datacenterIdBits - sequenceBits - infoBits;private final long sequenceShift = infoBits;private final long workerIdShift = infoBits + sequenceBits;private final long datacenterIdShift = infoBits + sequenceBits + workerIdBits;private final long timestampShift = infoBits + sequenceBits + workerIdBits + datacenterIdBits;private final long sequenceMask = -1L ^ (-1L << sequenceBits);private long workerId;private long datacenterId;private long sequence = 0L ;private long lastTimestamp = -1L ;public MySnowflakeIdWorker (long workerId, long datacenterId) {if (workerId > maxWorkerId || workerId < 0 ) {throw new IllegalArgumentException ("worker Id can't be greater than %d or less than 0" , maxWorkerId));if (datacenterId > maxDatacenterId || datacenterId < 0 ) {throw new IllegalArgumentException ("datacenter Id can't be greater than %d or less than 0" , maxDatacenterId));this .workerId = workerId;this .datacenterId = datacenterId;public synchronized long nextId (String data) {long timestamp = timeGen();if (timestamp < lastTimestamp) {throw new RuntimeException ("Clock moved backwards. Refusing to generate id for %d milliseconds" ,if (lastTimestamp == timestamp) {1 ) & sequenceMask;if (sequence == 0 ) {else {0L ;long info = infoGen(data);long id = ((timestamp - startTimestamp) << timestampShift) return id;protected long tilNextMillis (long lastTimestamp) {long timestamp = timeGen();while (timestamp <= lastTimestamp) {return timestamp;protected long timeGen () {return System.currentTimeMillis();protected long infoGen (String data) {String s = PinYinUtil.getDataHeadChar(data);long info = string2long(s);return info;protected long string2long (String str) {char [] cs = str.toCharArray();long lo = 0 ;for (int i = 0 ; i < cs.length; i++) {5 ;if (cs[i] != ' ' ) {'a' + 1 ;return lo;protected void idDecoder (long id) {long timestampFilter = (-1L ^ (-1L << timestampBits) << timestampShift);long datacenterIdFilter = (-1L ^ (-1L << datacenterIdBits) << datacenterIdShift);long workerIdFilter = (-1L ^ (-1L << workerIdBits) << workerIdShift);long sequenceFilter = (-1L ^ (-1L << sequenceBits) << sequenceShift);long infoFilter = -1L ^ (-1L << infoBits);long ts = ((id & timestampFilter) >> timestampShift) + startTimestamp;long did = (id & datacenterIdFilter) >> datacenterIdShift;long wid = (id & workerIdFilter) >> workerIdShift;long seq = (id & sequenceFilter) >> sequenceShift;long info = id & infoFilter;"time: " + new SimpleDateFormat ("yyyy-MM-dd HH:mm:ss" ).format(new Date (ts)));"datacenter id: " + did);"worker id: " + wid);"sequence: " + seq);"data: " + PinYinUtil.getDataFromLong(info));public static void main (String[] args) {MySnowflakeIdWorker idWorker = new MySnowflakeIdWorker (0 , 0 );long l = idWorker.nextId("你好谢谢" );
1
2
3
4
5
6
7
8
9
10
11
12
13
14
15
16
17
18
19
20
21
22
23
24
25
26
27
28
29
30
31
32
33
34
35
36
37
38
39
40
41
42
43
44
45
46
47
48
49
50
51
52
53
54
55
56
57
58
59
60
61
62
63
64
65
66
67
68
69
70
71
72
73
74
75
76
77
78
79
80
81
82
83
84
85
import net.sourceforge.pinyin4j.PinyinHelper;public class PinYinUtil {private static int dataWord = 4 ;public static String string2AllTrim (String value) {if (isNull(value)) {return "" ;return value.replaceAll("[^a-zA-Z\u4e00-\u9fa5]" , "" );public static boolean isNull (Object strData) {if (strData == null || String.valueOf(strData).trim().equals("" )) {return true ;return false ;public static String getPinYinHeadChar (String str) {if (isNull(str)) {return "" ;String convert = "" ;for (int j = 0 ; j < str.length(); j++) {char word = str.charAt(j);if (pinyinArray != null ) {0 ].charAt(0 );else {return convert.toLowerCase();public static String getDataHeadChar (String str) {String s = PinYinUtil.getPinYinHeadChar(str);if (s.length() < dataWord) {for (int i = 0 ; i < dataWord - s.length(); i++) {" " ;else if (s.length() > dataWord) {0 , dataWord);return s;public static String long2InfoString (long lo) {long filter = -1L ^ (-1L << 5 );StringBuffer info = new StringBuffer ();while (lo != 0 ) {int n = (int ) (lo & filter);if (n == 0 ) {char c = ' ' ;else {char c = (char ) ('a' + n - 1 );5 ;return info.reverse().toString();public static String getDataFromLong (long lo) {String data = long2InfoString(lo);return data;public static void main (String[] args) {"你好谢谢" ));
java获取汉字的首字母_java获取中文首字母_可乐丿不加冰的博客-CSDN博客